Mesh binding tutorial
January 21st, 2020
Many characters rigged in Spine require additional images for some of their parts during their animations, for example to add perspective or visual effects. When these new parts are meshes, it can be tricky to bind them to bones and setup weights because the pose where they are needed is in an animation, not the setup pose. This post covers how to do exactly that!
Binding in animate mode
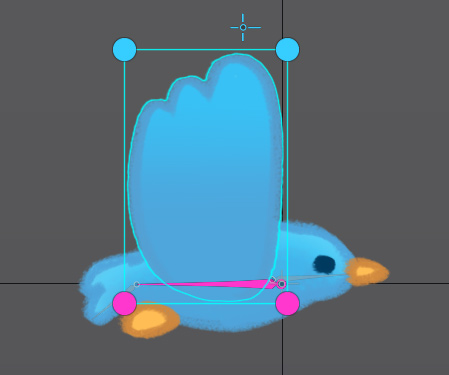
Consider this bird's wings:

We'd like to have a "flapping" animation that uses a separate mesh for the downward and upward wings, to add visual variation to the bird. We don't want to add additional bones to do it, which would clutter the skeleton and make it difficult for the two meses to behave as the same wing. Instead, the wing bone should control both meshes.
For our bird, the setup pose looks like the left side in the image above. The downward wing is bound to the body and wing bones. When the wing bone moves up and down, the mesh deforms to look like the wing is flapping.
The upward wing mesh is tricky: we want the wing bone to control the tip of the upward mesh, as it does the downward mesh, but in the setup pose the wing bone is not positioned at the tip of the upward mesh. If we bind the upward mesh to the wing bone in the setup pose, it will make controlling the mesh difficult.
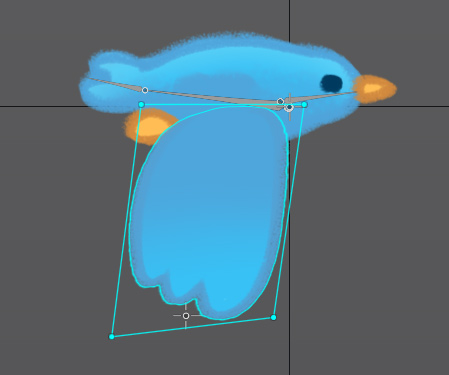
The solution is to bind the bones in animate mode (note that Spine 3.8.77 or later is required). You can download the bird project if you'd like to try doing it yourself. Open bird-before.spine and go to animate mode. Move the timeline position to frame 5, which is when the wing bone is at its highest. Next, we need to place the upward wing in the right place with the Translate tool:
If Auto Key is enabled, moving the mesh in animate mode will create a deform key, as in the image above. That is fine, the following steps will work either way.
Next, click Bind in the Weights view and choose the body and wing bones. Use the Weights tool to set the top 2 vertices 100% for the wing and the bottom 2 vertices 100% for the body:
Once that is done, both wing meshes are controlled by the wing bone, making it very easy to control when switching between them:
If you show the upward wing in setup mode, you'll find that it looks odd:
This happens because it was bound to the wing bone when it was moved up in the animation, but the wing bone is moved down in the setup pose. It is normal for a mesh to look strange in setup mode when it is intended for use in a pose from an animation, not in the setup pose.
Update bindings
The important part is that the bones are in the correct position when they are bound to the mesh, which is called the "bind pose". When the bones are moved from the bind pose, the mesh will be deformed based on the mesh's vertex weights. Let's look at what happens if bones are bound in the wrong position and how that can be fixed.
Start over with the bird-before.spine project, but this time in setup mode show the upward wing and move it into position with the Translate tool. Bind it to the body and wing bones, then show the downward wing.
Next go to animate mode and move the timeline position to frame 5. The upward wing only moves with the body bone because we haven't set weights for the wing bone yet. However, if we set the weights as we did before, the result is not what we want:
Whenever the vertices move when you are adjusting weights, it means that the bones have been moved since the bones were bound to the mesh. In this case, the wing bone has been moved up from where it was bound, so the vertices will move up when weighted to the wing bone.
The Update Bindings button in the Weights view can help in this situation! When clicked, it resets the bind pose for the bones using the current bone positions and mesh vertex positions. Afterward, when weights are changed the vertices will not move.
Back in Spine, on frame 5 in animate mode, click Update Bindings, then set the weights for the wing bone. You'll find the vertices don't move and the end result is the same as if we had bound the bones in this position.
Tips and fixing mistakes
You may need to adjust the pose of bones which are bound to a mesh, without affecting the mesh. To do so, enable image compensation and adjust the bones.
You may need to redo all the weights for a mesh. To do so, click Reset in the mesh properties at the bottom of the tree. This will remove all weights and reset the mesh so it is not deformed. If you want to keep the current vertex positions, you can remove the bones in the Weights view instead of using Reset.
It can be helpful to create an animation that keys the bind pose for the bones bound to a mesh. This allows you to get back to the bind pose for adding new bones or redoing the weights for a mesh. In the bird project we can do this by going to frame 5, but this may not be easy to remember and later the bones on frame 5 might have be moved.
Conclusion
Binding bones and setting weights can be a little tricky, but is a powerful feature. Showing different meshes in the middle of animations is very common and the workflows described above make it quite easy.
We hope you found this article interesting and we'd love to continue discussion on the Spine forum.